
 First, I'd like to apologize my English. I'm not a native speaker and translating from old Finnish proved to be bit of a challenge. ;)
So, you'll need 2 1/2 meters (2,735 yards) of fabric 120 cm (48") wide. The article says that the original dress in the TV-show was made from silk lining fabric. As far as I know, this probably wasn't actually silk, but some other fabric (of man-made fibres). I'd say that light weight fabrics (with good draping properties) work better than heavier ones for a dress like this (like that sheer cotton versus thicker linen that I've used for this dress so far).
One word of warning… The end result will be much nicer if you take the time and preshrink your fabric before cutting. Warp and weft tend to shrink in different ways due to the tension differences in fabrication process. If the fabric is not prepared the hem will most likely turn uneven in the first wash, which is very usual problem with circle skirts and like.
Part 1: Cutting

 Then fold the fabric crosswise bringing the corner CD to E (Picture 2). After this you should have the triangular shape seen in Picture 3 and four layers of fabric.
Measure 20 cm (8”) from the corner AB along both sides of the triangle (AB-ECD and AB-F), marking X and Y. Cut away the corner along the curved line (I recommend pinning the fabric layers together before cutting) drawn between these two points (X, Y). This curved line will be the neckline of the dress (Picture 3).

Measure the added length from the point X to point P (and mark the point) and then from Y to Q. Carefully draw the hemline measuring from the curved line X-Y so that every point on hemline has an equal distance to the neckline. Now cut along the line (once again pinning the layers together might be a good choice) from P to Q.
Now open the last fold leaving the fabric only twofold. Voila! You’ve got your two dress pieces (front and back) now (Picture 4).
Baste the sides together starting from the hem. On both sides of the bodice leave c. 37 cm (c. 15”) open until you’ve tried to fit the garment to see how much room is needed for arm holes. Then baste the rest as needed to fit your own measurements.
From the leftover fabric cut two strips for shoulder straps. The width is optional, cut as wide or narrow as you like, but remember to leave some extra fabric so you can finish the edges... and cut the strips long enough, you can trim the excess lenght later.
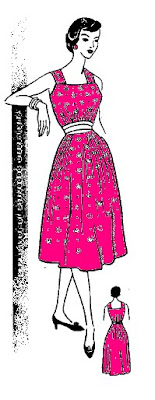
The dress in the picture has a soft gathered sash cut on the bias. The width is 25 cm (10”) and it closes on the back side with hook and eye closure. The instructions suggest that self fabric belt is another possibility. (Purchased belt works just as fine...)
Part 2: Fitting

When fitting the dress you’ll need another person to help you (the shoulder straps haven’t bee attached to the dress yet). Turn the dress right side out and try it on. Attach the dress to the straps of your petticoat (!) using pins. See how far the side seams should go and baste them a bit further up if necessary.
The shoulder straps are first pinned to front of the dress. If the straps are wide, you can gather them a bit before attaching them to the bodice (see picture 5). Shorten the straps as needed and pin them to the back part too.
If you are making the wide gathered sash, try it on also now. Pull it tight to the back and pin it together in the middle of the back. Cut excess fabric away leaving enough to turn the raw edges in. If you are using self-fabric or purchased belt, the instructions suggest trying also these on at this point.
Take the dress off and remove the straps.
Part 3: Sewing
 You’ll need a facing for the neckline… This can be either the same fabric or some other, whatever you decide. First, spread the top on a piece of paper (see picture 6) and draw the
  outline of the neckline and armholes on the paper (it needs to continue 2,5 cm or 1”, past the ending point of the future side seam). Remove the dress and draw the facing about 5cm (2”) wide (picture 7). Using this paper pattern cut two facings (front and back) on the bias (picture 8).
Machine stitch the side seams (picture 9), iron them open and finish the raw edges.
Turn in the raw edges of the shoulder straps and stitch (picture 10), you can also line them if you want.
 Baste the shoulder straps to bodice front right sides together (see picture 11), the other ends of straps hanging towards the hemline.
Finish the bottom edge of the facing as needed. Put the facing on top of the bodice front and the shoulder straps right sides together with the dress (picture 12). Baste and then machine stitch. Turn
 the right side out and iron.
 Blind stich the facings to the dress on the wrong side as seen in  Picture 13.
Then just hem the dress and you're done!

